To encrypt and hide files in a carrier file you can use the wizard which will guide you step-by-step through the process. You can also use a shell application to open east-tec InvisibleSecrets and jump directly to a step (e.g.: right-click some items in Windows Explorer and select from the east-tec InvisibleSecrets submenu the Hide… command).
The steps you have to follow to hide files are described bellow:
1. Select the action: Hide Files
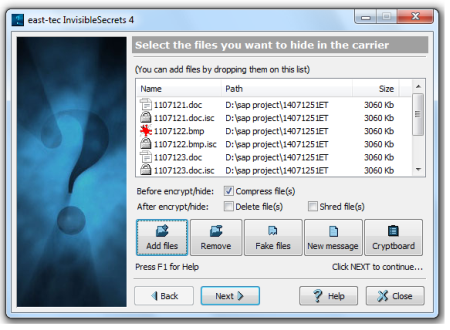
2. Select the source files
-
Click the Add files button or press the INSERT key to add files for the encrypt/hide process.
-
Click the Fake Files button to add fake files for the hiding process.
Fake Files are randomly generated files, extremely useful to create diversions. They will be the worst nightmare for any opponent. The fake files will be wiped out after the process.
-
Click the New Message button to create a new text message to hide. east-tec InvisibleSecrets will create a new RTF file (the subject is the file's name ) and start the default word editor. The message will be wiped out after the process. If you want to keep the message you must also save it with another file name.
-
Click the Remove button or press the DELETE key to remove files from the list of files for the hide process.
-
Click Cryptboard button to add files from Cryptboard.**
-
You can also add files and folders by dragging them from other applications and dropping on the list.
-
The files can be compressed before the process, wiped after or simply deleted.
Note: We recommend compression before hiding or encryption because it's hard (sometimes impossible) to compress a file after encryption.
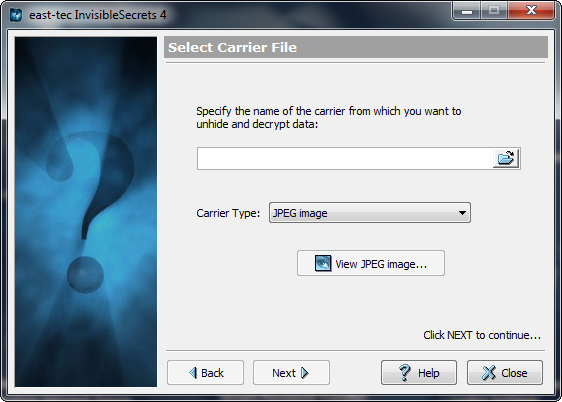
3. Select the carrier file
-
Enter a valid carrier file name in the edit box east-tec InvisibleSecrets can hide in JPEG, PNG, BMP, HTML and WAV. If you have installed several drivers for the same carrier type, you can select which one to use from the Carrier Type drop-down list. The original carrier can be wiped out after the process.
-
You can click the middle button to open the carrier with the associated program.
4. Encryption Settings

-
Enter a password and confirm it by typing a second time. You can click the Passwords button to select one from a Password List. Click the View Password check box to make the password visible.
-
Select an encryption algorithm.
Warning: If you forget the password (or the encryption algorithm) you will never be able to unhide/decrypt a file.
Click the Skip Encryption check box to skip the encryption process and only hide the files in the carrier.
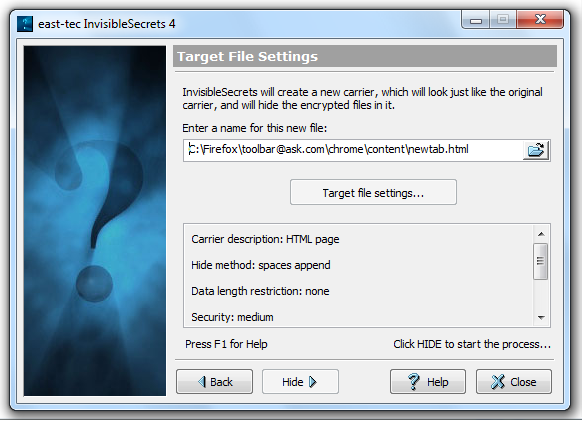
5.Target file settings
-
Enter a valid name for the target carrier (the new carrier that will be created, that will look exactly like the original carrier, but will have the hidden information inside). Important: The target carrier cannot be the same with the original carrier!
-
Click the large button (Target file settings) to set hiding options, if available. This option will be available only if the carrier's driver allows it.
-
Click Hide to start the process.
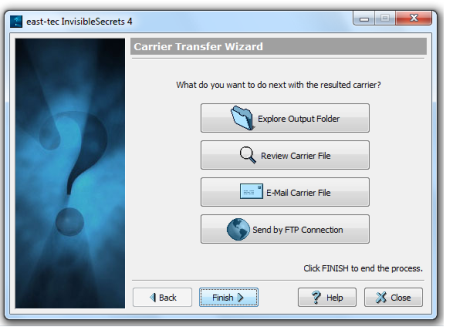
Optional step: Choose what to do with the resulted file
When the hiding process is done you can choose what to do with the resulted file:
-
Explore Output Folder: Windows Explorer will open the folder where resulted carrier was saved.
-
Review Carrier File: See how the carrier file "looks" after the hiding process.
-
Email Carrier File: Send the carrier file by email.
-
Send by FTP Connection: You will have to specify:
- Host
- user name
- password
- initial remote directory.
- check PASV Mode if applicable.
or
- click FTP Connections to choose a connection from the Connections List.
A FTP Connections button is available - click this button to save any FTP Connection in a list of FTP Connections.